Monday, September 23, 2013
How to move your iTunes library to an external drive
Apples iTunes Match service lets you store all your music in the cloud, but some people prefer to have a local copy of all their music instead. Its free, and doesnt disappear if your internet connection goes down.
You might have thousands of tracks youve ripped from CD over the years, for example. This is the more conventional way to use iTunes and its great, until your library starts to get too big for your hard drive. And with more and more people using ultraportable MacBook Airs, storage capacity can be an issue.
Luckily, iTunes makes it fairly easy to move your library to an external drive, even one connected to your Wi-Fi router. This can be a regular USB drive, for which youre best off using an Apple AirPort Extreme router, or a NAS (network attached storage) drive. These have special abilities, like being able to broadcast a music collection to any copies of iTunes on your network.
The clever thing about using iTunes Server on a NAS is that these drives tend to be very high capacity, and can be shared between lots of users. The beauty of having a shared, wireless music library is that it can be much bigger than one you would store on your Mac, and more advanced users can control who accesses it by tweaking the shared drive settings.
At a simpler level, you might just want to access the library yourself, in which case all you need is an AirPort Extreme and a USB hard drive.
Read more »
You might have thousands of tracks youve ripped from CD over the years, for example. This is the more conventional way to use iTunes and its great, until your library starts to get too big for your hard drive. And with more and more people using ultraportable MacBook Airs, storage capacity can be an issue.
Luckily, iTunes makes it fairly easy to move your library to an external drive, even one connected to your Wi-Fi router. This can be a regular USB drive, for which youre best off using an Apple AirPort Extreme router, or a NAS (network attached storage) drive. These have special abilities, like being able to broadcast a music collection to any copies of iTunes on your network.
The clever thing about using iTunes Server on a NAS is that these drives tend to be very high capacity, and can be shared between lots of users. The beauty of having a shared, wireless music library is that it can be much bigger than one you would store on your Mac, and more advanced users can control who accesses it by tweaking the shared drive settings.
At a simpler level, you might just want to access the library yourself, in which case all you need is an AirPort Extreme and a USB hard drive.
How to move your iTunes library
1. Gather your files
If youve been adding music to a library for a while, it can be worth forcing iTunes to copy everything into a single folder prior to moving it, to make sure you dont lose or unlink music files. Go into iTunes Preferences > Advanced tab and turn on Keep iTunes Media Folder Organized.2. Consolidate the library
Now go into File > Library in iTunes and choose Organize Library. From the window, tick Consolidate Files and press OK. This forces iTunes to copy music files that currently exist outside of your root music folder into that folder, making it possible to safely copy it in the next step.3. Copy the library
Now connect the USB drive to your Mac or to your AirPort Express, in which case you will need to use AirPort Utility to identify it as a shared volume. Go to your Home directory > Music and find the folder called iTunes. Copy this folder to a sensible location on your USB drive.4. Reset the library location
Back in iTunes, go to Preferences > Advanced and click to change the library location. Point iTunes at the location where you just copied it, and it will see the library over the network. Also, go into System Preferences > Users and Groups and make the networked drive auto-mount on login.5. Use a NAS
Here we have a NAS drive connected to our AirPort Extreme using an Ethernet cable, with the NAS manager software installed. Drag a folder of music over to the drive and place it inside a pre-created folder called Music. You could also drag your iTunes library folder to this location.6. Log into the NAS
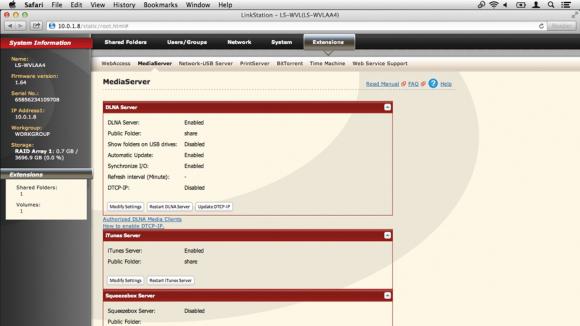
Log into the NAS control panel. In the case of Buffalo drives its done by right-clicking on it and choosing Settings. You may have to log in using your administrator password. Once logged in, click to the Extensions section for a tab called MediaServer. Theres a section called iTunes Server.7. Turn on iTunes Server
Click to enable iTunes Server. You may also want to customise the location of the shared music folder: click Modify Settings and use the Public Folder dropdown to select any drive folders. Here, weve pointed it at the Music folder we created earlier. Click Save and return to iTunes.8. Access the share
Back in iTunes, look in the sidebar on the left under the Shared tab and you should now see your NAS device. These can be played by anyone on your network with access to the NAS. iTunes may not find artwork for the files since this relies on signing in with an Apple ID, but they will play fine.Friday, September 20, 2013
Games Puzzle Android Classic Slydris
Puzzle game is indeed very much from Novl gamers, especially game did evolution of the game jadul to games that more modern! Games Slydris is one of them. Game that took the theme puzzle - puzzle is hardly liked by the community because puzzle game - puzzle game always presents a neat, challenging, filled with curious, and not boring. In the olden days one of the puzzle game that is famous for the game tetris game, because it was very addictive, turning on his mind, and very pleasant.

With graphic that modern and gameplay that unique but busy games Slydris was able to give nuance that sophisticated and awesome when play it, and to be able to make people take time to play games. so if you want to play this game you can buy and download Games Slydris in Google Play store.
With graphic that modern and gameplay that unique but busy games Slydris was able to give nuance that sophisticated and awesome when play it, and to be able to make people take time to play games. so if you want to play this game you can buy and download Games Slydris in Google Play store.
Tuesday, September 17, 2013
Samsung Galaxy Note launched 10 1 Android 4 1 update XXBLJ9
Finally Another Samsung device Receive Android Jelly Bean update. And at this time is the turn for Samsung Galaxy Note 10.1. So For You The Owner Of the one of the samsung flasgship device can update to the latest version of android operating System. Then you can feel the joy of the project butter. Android 4.1 official firmware for galaxy Note 10.1 At this moment only available for German via OTA. Or If you want you can also download the firmware from samfirmware.com then manually flash it. The size of firmware file is 300MB. Android is good
The OTA update is about 300 MB in size, has the version number XXBLJ9, brings with it some new features and especially the accelerated system. New features include pop-play, new gestures, cutting out the function of the Galaxy Note II and new pop-up apps.
New features On Galaxy Note Android 4.1
Following is the new features on Samsung Galaxt Note 10.1 with Android Jelly Bean:- The S-Pen functionality is now the equivalent of the Galaxy Note II
- Multitasking was improved, the size of the windows can be changed.
- The app is now on board Paper Artist (Also available at the grade II)
- New font selectable
- New apps pop (picture with Julian c)
- Create quick command window, new commands
- Faster system


Now, after the Samsung GALAXY Note 10.1 receive Android 4.1 Update, in the coming days is likely the Samsung Galaxy S2 and the Samsung GALAXY Note finally be honored with Android 4.1. For these two models, the update was indeed also scheduled for November. When the time comes then, here you will find out!
Saturday, September 14, 2013
Google Nexus 5 release nears as retailers drop Nexus 4
A Google Nexus 5 release date could be with us in the near future, as the existing Google Nexus 4 is dropped by retailers.
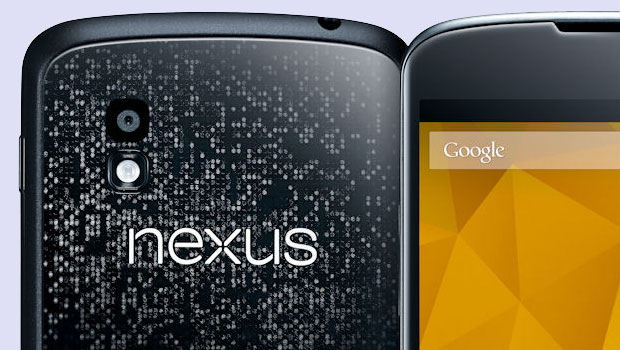
With the white Google Nexus 4 yesterday being confirmed as ‘sold out’ on the Google Play store, the LG manufactured handset has now started to disappear from retailers, suggesting a replacement could be on the way in the form of the much rumoured Google Nexus 5.
One of the first UK retailers to stock the Google Nexus 4 outside of Google’s own retail channels, Carphone Warehouse has today dropped the Android 4.2 launching handset without warning, a potential sign of new things to come from Google’s Mountain View campus. The seeming finality of the retailer’s decision is something of a surprise, with the Samsung Galaxy S4 and HTC One rival removed without trace from the company’s website.
Although far from the only UK retailer to offer the Google Nexus 4, Carphone Warehouse’s decision to drop the Google Nexus 4 poses many questions, with the high-end handset with a wallet-friendly price tag only recently overcoming stock constraints to become a readily available option.
A device widely expected to launch Android 5.0 Key Lime Pie, a selection of Google Nexus 5 rumours have done the rounds in recent months, bringing with them a selection of claimed specs.
According to recent reports, the Google Nexus 5 will pair its new Android OS with a range of high-end, iPhone 5 toppling specs. It has been suggested the currently unconfirmed phone will land with a 5.2-inch OLED display with a 1920 x 1080p Full HD display in tow.
On top of this, further Google Nexus 5 rumours have pointed to a phone with a 2.3GHz quad-core processor, 3GB of RAM and the option of 16GB, 32GB or 64GB storage capacities. The Google Nexus 4 was criticised for only being made available with 8GB or 16GB of internal storage. A 16-megapixel rear-mounted camera and a hearty 3300mAh Lithium-Polymer battery have also been mooted.
Back in May LG, manufacturing partner of the Google Nexus 4 seemed to rule itself out of contention to produce the upcoming Google Nexus 5. Speaking on the possibility of back-to-back Nexus dealings, Kim Wong, Vice President of LG Mobile in Europe, stated: “The Nexus 4 was a great success despite the production problems for us and Google. However, we do not need such a marketing success again.”
Read more »
With the white Google Nexus 4 yesterday being confirmed as ‘sold out’ on the Google Play store, the LG manufactured handset has now started to disappear from retailers, suggesting a replacement could be on the way in the form of the much rumoured Google Nexus 5.
One of the first UK retailers to stock the Google Nexus 4 outside of Google’s own retail channels, Carphone Warehouse has today dropped the Android 4.2 launching handset without warning, a potential sign of new things to come from Google’s Mountain View campus. The seeming finality of the retailer’s decision is something of a surprise, with the Samsung Galaxy S4 and HTC One rival removed without trace from the company’s website.
Although far from the only UK retailer to offer the Google Nexus 4, Carphone Warehouse’s decision to drop the Google Nexus 4 poses many questions, with the high-end handset with a wallet-friendly price tag only recently overcoming stock constraints to become a readily available option.
Google Nexus 5 Rumours
A device widely expected to launch Android 5.0 Key Lime Pie, a selection of Google Nexus 5 rumours have done the rounds in recent months, bringing with them a selection of claimed specs.
According to recent reports, the Google Nexus 5 will pair its new Android OS with a range of high-end, iPhone 5 toppling specs. It has been suggested the currently unconfirmed phone will land with a 5.2-inch OLED display with a 1920 x 1080p Full HD display in tow.
On top of this, further Google Nexus 5 rumours have pointed to a phone with a 2.3GHz quad-core processor, 3GB of RAM and the option of 16GB, 32GB or 64GB storage capacities. The Google Nexus 4 was criticised for only being made available with 8GB or 16GB of internal storage. A 16-megapixel rear-mounted camera and a hearty 3300mAh Lithium-Polymer battery have also been mooted.
Back in May LG, manufacturing partner of the Google Nexus 4 seemed to rule itself out of contention to produce the upcoming Google Nexus 5. Speaking on the possibility of back-to-back Nexus dealings, Kim Wong, Vice President of LG Mobile in Europe, stated: “The Nexus 4 was a great success despite the production problems for us and Google. However, we do not need such a marketing success again.”
Wednesday, September 11, 2013
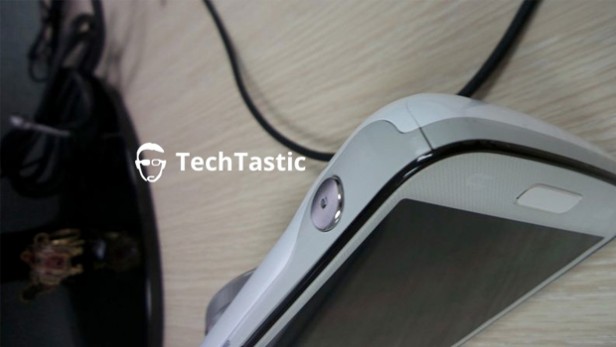
Samsung Galaxy S4 Zoom pictured in all its chubby glory
More pictures of the Samsung Galaxy S4 Zoom have appeared online, confirming the handset’s chunky form factor.
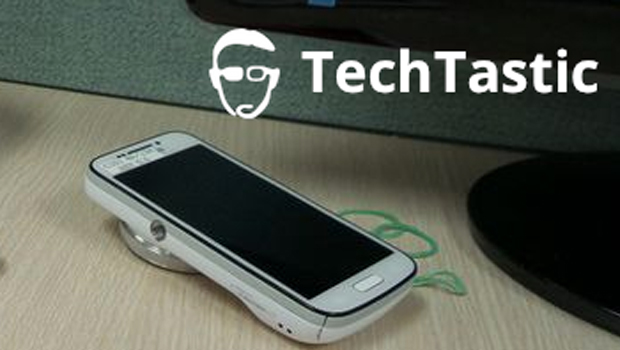
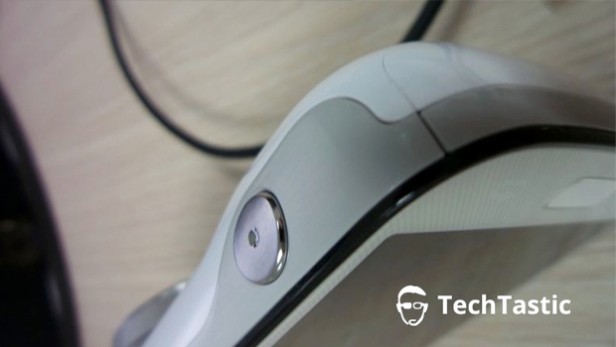
The chubby camera-centric smartphone has appeared online again, confirming that yesterday’s leaked Samsung Galaxy S4 Zoom photos are in fact legitimate. They further showcase the rather large 16-megapixel camera wielding edition of the slim Samsung Galaxy S4.
Looking somewhat like a Samsung Galaxy Camera and Samsung Galaxy S4 hybrid, the S4 Zoom is a sizeable smartphone that has yet to be confirmed by the South Korean electronics manufacturer, but could potentially be another edition of the Samsung Galaxy S4.
Samsung’s flagship smartphone already features a 13-megpizel auto focus camera with flash and zero-shutter flash, but the Galaxy S4 Zoom would boost that to a 16-megapixel snapper with optical zoom.
The Zoom will be one of a number of Samsung Galaxy S4 variants on offer, complementing the waterproof Samsung Galaxy S4 Active and reduced spec Samsung Galaxy S4 Mini.
Due to launch at Samsung’s London-based press event on June 20, the Samsung Galaxy S4 Zoom is rumoured to be “Samsung’s last product of the Galaxy S4 range”.
The Galaxy S4 Zoom should pack a 4.3-inch qHD display, which is quite a downgrade from the Samsung Galaxy S4’s 5-inch Super AMOLED display with 1920 x 1080p Full HD resolutions.
Rumoured to play host to a 1.6GHz processor, it won’t be as powerful as the 1.9Ghz quad-core SoC inside the Samsung Galaxy S4.
As with the other Samsung Galaxy S4 editions, the camera-centric option will run on Android 4.2.2 Jelly Bean with Samsung’s TouchWiz UI.
It will be interesting to see how many millimetres the Samsung Galaxy S4 Zoom will add to the 7.9mm thickness of the Samsung Galaxy S4, and how much additional weight that optical zoom camera will carry. If it becomes too cumbersome, we can’t see it being an attractive alternative to the flagship Samsung Galaxy S4 come launch.
Read more »
The chubby camera-centric smartphone has appeared online again, confirming that yesterday’s leaked Samsung Galaxy S4 Zoom photos are in fact legitimate. They further showcase the rather large 16-megapixel camera wielding edition of the slim Samsung Galaxy S4.
Looking somewhat like a Samsung Galaxy Camera and Samsung Galaxy S4 hybrid, the S4 Zoom is a sizeable smartphone that has yet to be confirmed by the South Korean electronics manufacturer, but could potentially be another edition of the Samsung Galaxy S4.
Samsung’s flagship smartphone already features a 13-megpizel auto focus camera with flash and zero-shutter flash, but the Galaxy S4 Zoom would boost that to a 16-megapixel snapper with optical zoom.
The Zoom will be one of a number of Samsung Galaxy S4 variants on offer, complementing the waterproof Samsung Galaxy S4 Active and reduced spec Samsung Galaxy S4 Mini.
Due to launch at Samsung’s London-based press event on June 20, the Samsung Galaxy S4 Zoom is rumoured to be “Samsung’s last product of the Galaxy S4 range”.
The Galaxy S4 Zoom should pack a 4.3-inch qHD display, which is quite a downgrade from the Samsung Galaxy S4’s 5-inch Super AMOLED display with 1920 x 1080p Full HD resolutions.
Rumoured to play host to a 1.6GHz processor, it won’t be as powerful as the 1.9Ghz quad-core SoC inside the Samsung Galaxy S4.
As with the other Samsung Galaxy S4 editions, the camera-centric option will run on Android 4.2.2 Jelly Bean with Samsung’s TouchWiz UI.
It will be interesting to see how many millimetres the Samsung Galaxy S4 Zoom will add to the 7.9mm thickness of the Samsung Galaxy S4, and how much additional weight that optical zoom camera will carry. If it becomes too cumbersome, we can’t see it being an attractive alternative to the flagship Samsung Galaxy S4 come launch.
Sunday, September 8, 2013
Solar Mobile Phone charger complete circuit diagram
Solar Mobile Phone charger Circuit:
Here is another idea of harvest Solar energy for charging.This charger can charge almost all types of batteries such as Mobile phone batteries. It uses a solar panel to convert light in to electrical energy.
This circuit explains itself whole procedure.
Click to zoom
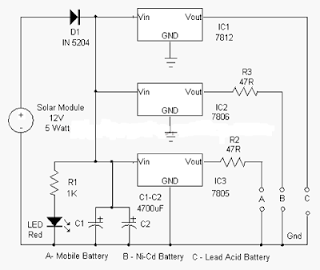
A 12 volt and 5 watt solar panel is used as source of current.The cells in the panel are made up of semiconductor material which convert sun light energy in to electrical energy.
When the sunlight is a peak means maximum, then solar panel can generate upto 16.5 volts with 400mA current.This current is able to charge mobile phone battery.
Diode D1 allow current to pass in to three regulator ICs to get regulated output.
This output voltage is able to charge Lead Acid battery.
The battery can be connected to point C and ground.
IC2 gives regulated 6 volt to charge NiCd battery. IC3 provides regulated voltage to charge all types of mobile phone batteries which is rated at 3.6 volt.
Red led indicates its charging the battery.
Last Words:
This is simple circuit, if you found any difficulty in understanding this circuit, let me know through comments, ill respond you as earlier as possible.
Here is another idea of harvest Solar energy for charging.This charger can charge almost all types of batteries such as Mobile phone batteries. It uses a solar panel to convert light in to electrical energy.
This circuit explains itself whole procedure.
Click to zoom
A 12 volt and 5 watt solar panel is used as source of current.The cells in the panel are made up of semiconductor material which convert sun light energy in to electrical energy.
When the sunlight is a peak means maximum, then solar panel can generate upto 16.5 volts with 400mA current.This current is able to charge mobile phone battery.
Diode D1 allow current to pass in to three regulator ICs to get regulated output.
This output voltage is able to charge Lead Acid battery.
The battery can be connected to point C and ground.
IC2 gives regulated 6 volt to charge NiCd battery. IC3 provides regulated voltage to charge all types of mobile phone batteries which is rated at 3.6 volt.
Red led indicates its charging the battery.
Last Words:
This is simple circuit, if you found any difficulty in understanding this circuit, let me know through comments, ill respond you as earlier as possible.
Thursday, September 5, 2013
How to Update Galaxy Tab 7 0 Plus P6200 with Android 4 1 2 XXMD6 Jelly Bean Official Firmware
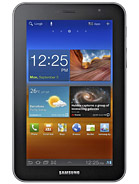
This update brings some new stuff on the Samsung Galaxy Tab Plus 7.0 such as Google Now, Smart Stay, Blocking Mode that let users block any unwanted calls, new Gallery, a redesigned Home Screen launcher, Text-to-speech capability and a new notifications settings.
Firmware details
PDA: P6200XXMD6
CSC: P6200OLBMD5
Version: Android 4.1.2
Built date: April, 2013
Regions: Indonesia, Malaysia, Philippines, Singapore, Vietnam, Thailand
The Galaxy Tab 7.0 Plus users who fail to upgrade their devices with Android 4.1.2 XXMD6 Jelly Bean via official method for being region specific, may follow our step-by-step guide to install the update manually.
Pre-requisites
1. Install USB Driver for Samsung Galaxy Tab 7.0 Plus on the computer.
2. Enable USB Debugging Mode on the phone by navigating to Settings >> Developer Options.
3. Make a backup of all your important data before following the guide.
4. The Galaxy Tab 7.0 Plus should be factory unlocked and not locked to any particular carrier.
5. Ensure the battery of the tablet is charged more than 80 per cent.
6. The Android 4.1.2 XXMD6 Jelly Bean firmware is compatible only with Samsung Galaxy Tab 7.0 Plus P6200. Applying this on any incorrect variant will brick the device. Verify the model number of the Galaxy Tab 7.0 Plus by navigating to Settings >> About Phone.
File Required
1. Android 4.1.2 XXMD6 Jelly Bean Firmware for Galaxy Tab 7.0 Plus P6200
2. Odin 3.07
Steps to Update Galaxy Tab 7.0 Plus P6200 with Android 4.1.2 XXMD6 Jelly Bean Firmware
Step 1: Extract Firmware zip file that you downloaded already from above link, you will get a .tar.md5 file and some other files.
Step 2: Extract Odin zip file and you will get Odin3 v3.07.exe along with few other files.
Step 3: Power off your tablet. Wait 5-6 seconds for vibration to confirm complete switch off.
Step 4: Boot the device into Download Mode by pressing and holding Volume Down and Power buttons together. A warning screen will arrive, then press Volume Up button to enter into Download Mode.
Step 5: Run Odin on the computer as an Administrator.
Step 6: Connect the Galaxy Tab 7.0 Plus to the computer using USB cable while it is in the Download Mode. Wait until Odin detects the device. When the device is connected successfully, the ID: COM box will turn yellow with the COM port number. Additionally, the successful connected will be indicated by a message saying Added. If Odin fails to detect the device then re-install USB deriver.
Step 7: Choose the following files in Odin from extracted P6200XXMD6 firmware folder by using respective checkboxes:
- Select the PDA checkbox, and choose the file named .tar or .md5.
- Click the Phone checkbox, and choose the file with modem in its name (ignore if there is no such file)
- Click the CSC checkbox, and select the file with csc in its name (ignore if such file is missing)
- Choose the PIT checkbox, and choose the .pit file. Use only the file obtained during extracting in step 1 above, otherwise ignore it.
Step 8: In Odin, enable Auto Reboot and F. Reset Time checkboxes. Also, ensure the Re-Partition checkbox is chosen only if a .pit file was chosen in the previous step.
Step 9: Verify everything suggested in Step 7 and Step 8 is done correctly. Then hit the START button to begin the flashing process.
Step 10: Once flashing completed, your tablet will restart and soon you will see a PASS message with green background in the left-most box at the very top of the Odin. You can now unplug the USB cable to disconnect your device from computer.
Samsung Galaxy Tab 7.0 Plus P6200 should be now updated with official Android 4.1.2 XXMD6 Jelly Bean. Head over to Settings>> About Phone to verify the software version running on the device.
Note: If Galaxy Tab 7.0 Plus P6200 stuck at booting animation after Step 10 then go to recovery mode (press and hold the Volume Up and Power buttons together) and perform Wipe data/Factory Reset and Wipe Cache Partition task before selecting reboot system now function. In recovery mode use Volume keys to navigate between options and Power key to select the option. Please note, performing wiping task will erase your device internal memory data and not external SD card data.
Click here to know How to Root Galaxy Tab 7.0 Plus P6200 running on Android 4.1.2 XXMD6 Jelly Bean firmware.
Subscribe to:
Posts (Atom)