Showing posts with label how. Show all posts
Showing posts with label how. Show all posts
Monday, September 23, 2013
How to move your iTunes library to an external drive
Apples iTunes Match service lets you store all your music in the cloud, but some people prefer to have a local copy of all their music instead. Its free, and doesnt disappear if your internet connection goes down.
You might have thousands of tracks youve ripped from CD over the years, for example. This is the more conventional way to use iTunes and its great, until your library starts to get too big for your hard drive. And with more and more people using ultraportable MacBook Airs, storage capacity can be an issue.
Luckily, iTunes makes it fairly easy to move your library to an external drive, even one connected to your Wi-Fi router. This can be a regular USB drive, for which youre best off using an Apple AirPort Extreme router, or a NAS (network attached storage) drive. These have special abilities, like being able to broadcast a music collection to any copies of iTunes on your network.
The clever thing about using iTunes Server on a NAS is that these drives tend to be very high capacity, and can be shared between lots of users. The beauty of having a shared, wireless music library is that it can be much bigger than one you would store on your Mac, and more advanced users can control who accesses it by tweaking the shared drive settings.
At a simpler level, you might just want to access the library yourself, in which case all you need is an AirPort Extreme and a USB hard drive.
Read more »
You might have thousands of tracks youve ripped from CD over the years, for example. This is the more conventional way to use iTunes and its great, until your library starts to get too big for your hard drive. And with more and more people using ultraportable MacBook Airs, storage capacity can be an issue.
Luckily, iTunes makes it fairly easy to move your library to an external drive, even one connected to your Wi-Fi router. This can be a regular USB drive, for which youre best off using an Apple AirPort Extreme router, or a NAS (network attached storage) drive. These have special abilities, like being able to broadcast a music collection to any copies of iTunes on your network.
The clever thing about using iTunes Server on a NAS is that these drives tend to be very high capacity, and can be shared between lots of users. The beauty of having a shared, wireless music library is that it can be much bigger than one you would store on your Mac, and more advanced users can control who accesses it by tweaking the shared drive settings.
At a simpler level, you might just want to access the library yourself, in which case all you need is an AirPort Extreme and a USB hard drive.
How to move your iTunes library
1. Gather your files
If youve been adding music to a library for a while, it can be worth forcing iTunes to copy everything into a single folder prior to moving it, to make sure you dont lose or unlink music files. Go into iTunes Preferences > Advanced tab and turn on Keep iTunes Media Folder Organized.2. Consolidate the library
Now go into File > Library in iTunes and choose Organize Library. From the window, tick Consolidate Files and press OK. This forces iTunes to copy music files that currently exist outside of your root music folder into that folder, making it possible to safely copy it in the next step.3. Copy the library
Now connect the USB drive to your Mac or to your AirPort Express, in which case you will need to use AirPort Utility to identify it as a shared volume. Go to your Home directory > Music and find the folder called iTunes. Copy this folder to a sensible location on your USB drive.4. Reset the library location
Back in iTunes, go to Preferences > Advanced and click to change the library location. Point iTunes at the location where you just copied it, and it will see the library over the network. Also, go into System Preferences > Users and Groups and make the networked drive auto-mount on login.5. Use a NAS
Here we have a NAS drive connected to our AirPort Extreme using an Ethernet cable, with the NAS manager software installed. Drag a folder of music over to the drive and place it inside a pre-created folder called Music. You could also drag your iTunes library folder to this location.6. Log into the NAS
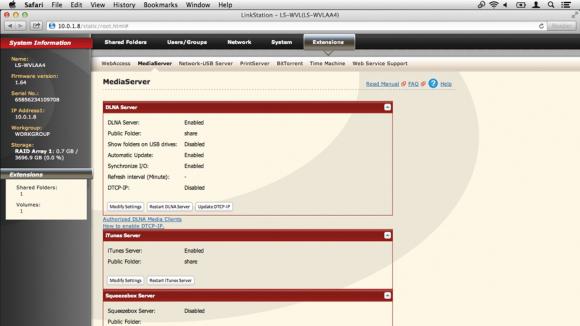
Log into the NAS control panel. In the case of Buffalo drives its done by right-clicking on it and choosing Settings. You may have to log in using your administrator password. Once logged in, click to the Extensions section for a tab called MediaServer. Theres a section called iTunes Server.7. Turn on iTunes Server
Click to enable iTunes Server. You may also want to customise the location of the shared music folder: click Modify Settings and use the Public Folder dropdown to select any drive folders. Here, weve pointed it at the Music folder we created earlier. Click Save and return to iTunes.8. Access the share
Back in iTunes, look in the sidebar on the left under the Shared tab and you should now see your NAS device. These can be played by anyone on your network with access to the NAS. iTunes may not find artwork for the files since this relies on signing in with an Apple ID, but they will play fine.Thursday, September 5, 2013
How to Update Galaxy Tab 7 0 Plus P6200 with Android 4 1 2 XXMD6 Jelly Bean Official Firmware

This update brings some new stuff on the Samsung Galaxy Tab Plus 7.0 such as Google Now, Smart Stay, Blocking Mode that let users block any unwanted calls, new Gallery, a redesigned Home Screen launcher, Text-to-speech capability and a new notifications settings.
Firmware details
PDA: P6200XXMD6
CSC: P6200OLBMD5
Version: Android 4.1.2
Built date: April, 2013
Regions: Indonesia, Malaysia, Philippines, Singapore, Vietnam, Thailand
The Galaxy Tab 7.0 Plus users who fail to upgrade their devices with Android 4.1.2 XXMD6 Jelly Bean via official method for being region specific, may follow our step-by-step guide to install the update manually.
Pre-requisites
1. Install USB Driver for Samsung Galaxy Tab 7.0 Plus on the computer.
2. Enable USB Debugging Mode on the phone by navigating to Settings >> Developer Options.
3. Make a backup of all your important data before following the guide.
4. The Galaxy Tab 7.0 Plus should be factory unlocked and not locked to any particular carrier.
5. Ensure the battery of the tablet is charged more than 80 per cent.
6. The Android 4.1.2 XXMD6 Jelly Bean firmware is compatible only with Samsung Galaxy Tab 7.0 Plus P6200. Applying this on any incorrect variant will brick the device. Verify the model number of the Galaxy Tab 7.0 Plus by navigating to Settings >> About Phone.
File Required
1. Android 4.1.2 XXMD6 Jelly Bean Firmware for Galaxy Tab 7.0 Plus P6200
2. Odin 3.07
Steps to Update Galaxy Tab 7.0 Plus P6200 with Android 4.1.2 XXMD6 Jelly Bean Firmware
Step 1: Extract Firmware zip file that you downloaded already from above link, you will get a .tar.md5 file and some other files.
Step 2: Extract Odin zip file and you will get Odin3 v3.07.exe along with few other files.
Step 3: Power off your tablet. Wait 5-6 seconds for vibration to confirm complete switch off.
Step 4: Boot the device into Download Mode by pressing and holding Volume Down and Power buttons together. A warning screen will arrive, then press Volume Up button to enter into Download Mode.
Step 5: Run Odin on the computer as an Administrator.
Step 6: Connect the Galaxy Tab 7.0 Plus to the computer using USB cable while it is in the Download Mode. Wait until Odin detects the device. When the device is connected successfully, the ID: COM box will turn yellow with the COM port number. Additionally, the successful connected will be indicated by a message saying Added. If Odin fails to detect the device then re-install USB deriver.
Step 7: Choose the following files in Odin from extracted P6200XXMD6 firmware folder by using respective checkboxes:
- Select the PDA checkbox, and choose the file named .tar or .md5.
- Click the Phone checkbox, and choose the file with modem in its name (ignore if there is no such file)
- Click the CSC checkbox, and select the file with csc in its name (ignore if such file is missing)
- Choose the PIT checkbox, and choose the .pit file. Use only the file obtained during extracting in step 1 above, otherwise ignore it.
Step 8: In Odin, enable Auto Reboot and F. Reset Time checkboxes. Also, ensure the Re-Partition checkbox is chosen only if a .pit file was chosen in the previous step.
Step 9: Verify everything suggested in Step 7 and Step 8 is done correctly. Then hit the START button to begin the flashing process.
Step 10: Once flashing completed, your tablet will restart and soon you will see a PASS message with green background in the left-most box at the very top of the Odin. You can now unplug the USB cable to disconnect your device from computer.
Samsung Galaxy Tab 7.0 Plus P6200 should be now updated with official Android 4.1.2 XXMD6 Jelly Bean. Head over to Settings>> About Phone to verify the software version running on the device.
Note: If Galaxy Tab 7.0 Plus P6200 stuck at booting animation after Step 10 then go to recovery mode (press and hold the Volume Up and Power buttons together) and perform Wipe data/Factory Reset and Wipe Cache Partition task before selecting reboot system now function. In recovery mode use Volume keys to navigate between options and Power key to select the option. Please note, performing wiping task will erase your device internal memory data and not external SD card data.
Click here to know How to Root Galaxy Tab 7.0 Plus P6200 running on Android 4.1.2 XXMD6 Jelly Bean firmware.
Friday, August 30, 2013
How to Root Galaxy Mega 6 3 I9200 I9205 on Android 4 2 2 Jelly Bean Firmware

Followed by the market rollout, XDA-Developers member VCore has released root method for both I9200 and I9205 version of Galaxy Mega 6.3.
Samsung Galaxy Mega 6.3 users who wish to root their devices, may follow our step-by-step guide.
Disclaimer: Rooting voids the warranty of your device. We and the developer of this rooting procedures shall not be held responsible if any undesirable outcomes may happen to your device. use of this root guide is solely at your own risk!
Pre-requisites
1. Install USB Driver for Samsung Galaxy Mega 6.3 on the computer.
2. Enable USB Debugging Mode on the phone by navigating to Settings >> Developer Options.
3. Make a backup of all your important data before following the guide.
4. The Galaxy Mega 6.3 should be factory unlocked and not locked to any particular carrier.
5. Ensure the battery of the phone is charged more than 80 per cent.
6. The Root Package file works only on Samsung Galaxy Mega 6.3. Applying these to any incorrect variant might brick the device. Verify the model number of the Galaxy Mega 6.3 by navigating to Settings >> About Phone.
File Required
1. Root Package for Galaxy Mega 6.3 (vcoreroot-v2.tar)
2. Odin 3.07
Steps to Root Galaxy Mega 6.3 Running on Android 4.2.2 Jelly Bean Firmware
Step 1: Extract Odin 3.07 file using winrar/7zip/winzip or any other extracting tool.
Step 2: Switch off the Galaxy Mega 6.3. Then boot the device into Download Mode by pressing and holding Volume Down, Home and Power buttons together until a construction Android robot icon with a warning triangle appears on screen. Now press the Volume Up button to enter Download Mode.
Step 3: Launch Odin on the computer as an Administrator.
Step 4: Connect the Galaxy Mega 6.3 to the computer using USB cable while it is in the Download Mode. Wait until Odin detects the device. When the device is connected successfully, the ID: COM box will turn blue with the COM port number. Additionally, the successful connected will be indicated by a message saying Added.
Note: If the Added message does not appear, then try re-install USB drivers or changing the port on the computer.
Step 5: In Odin, click the PDA button and select the vcoreroot-v2.tar file.
Step 6: Verify that Auto Reboot and F.Reset Time checkboxes are selected in Odin. Also, ensure the Re-Partition option in Odin is not selected.
Step 7: Double-check and click Start in Odin. The installation process will now begin.
Step 8: Once the installation process is completed, your phone will restart and soon you will see a PASS message with green background in the left-most box at the very top of the Odin. You can now unplug the USB cable to disconnect your device from computer.
Samsung Galaxy Mega 6.3 running on Android 4.2.2 Jelly Bean firmware is now rooted successfully. You can now install any app that requires root permission. Verify the root status of the device by downloading Root Checker app from Google Play Store.
Thanks to all fellas at XDA who first tried out this rooting technique. This method was originally posted via XDA-Developers original thread.
How To Install Custom Rom On Wildfire S
This is my last tutorial article that discusses about HTC Wildfire S. In this tutorial, will be explained more how to install the Custom ROM. In two discussions on Wildfire S (WFS) before, namely about how to Unlock Bootloader and Root WFS. Now is the time on how to optimize this Smartphone. So Internal Storage can much relieved, and UI look more awesome.
There are some Custom ROM recommended by some of Developer. Among Cynogenmod and Jikantaru XE ROM. But I will not explain all the ROM but only Jikantaru ROM XE. You can consider from the cool side of the UI as well as some optimization features. Okay before I guided step by step, it may be helps if i show results of Installing Custom ROMs Jikantaru XE ROM first. Android is good


In this tutorial I assume that all of you has already made the two previous stages, the Unlock Bootloader and Root HTC Wildfire S. So, no need to prepare a lot of things anymore. you just need Only required file JikantaruROM XE Custom ROM.
DOWNLOAD JIKANTARU : Download here
There are some Custom ROM recommended by some of Developer. Among Cynogenmod and Jikantaru XE ROM. But I will not explain all the ROM but only Jikantaru ROM XE. You can consider from the cool side of the UI as well as some optimization features. Okay before I guided step by step, it may be helps if i show results of Installing Custom ROMs Jikantaru XE ROM first. Android is good
In this tutorial I assume that all of you has already made the two previous stages, the Unlock Bootloader and Root HTC Wildfire S. So, no need to prepare a lot of things anymore. you just need Only required file JikantaruROM XE Custom ROM.
READ FIRST
- To do this tutorial you must have root your phone, read how to root htc wildfire s
- You must have Unlock the Bootloader
- It should be noted before installing custom ROM, it will be better make nandroid backup ( bakcup the ROM Default first.) Just in case if you want to revert to the original ROM.
- Okay, time to start the ROM installation phase.
DOWNLOAD JIKANTARU : Download here
Tutorial Install Jikantaru Rom On Wildfire S
- Keep in mind, in order to install this Custom ROM, requires a memory partition. There are many ways you can do. Most use "Mini Tool Partition." But I think it is less effective and according to some sources sometimes partitions using this tool can be lost so that the application installed on the SD card can be error. In these applications base on Windows, whereas Android is Linux. So in my opinion is safer to use CWM Recovery that also base on Linux, partitions is more easily, quickly, and accurately. If you want to use SD or memory capacity, choose a good quality.
- How to make partition: first go into HBOOT by
turn off your phone, remove the battery and reinsert it. Press the Volume Down button followed by Power (Volume Down + Power). - Once logged in HBOOT. Pick parts that go into CWM Recovery Recovery.
- Once inside the CWM Recovery. Choose Wipe Data / factory reset.

- After completion select Wipe cache partition.
- Select the Advanced tab.
- In this section, select Wipe Dalvik, then Format SD card. Format SD card to make it really clean so could be perfect partition. Partitioning can be done in many ways. It is up to use which method.

- After the SD card Format process completed, its partition time. Since I use 2 GB SD capacity. Then I will make partition into two (2). The first partition to EXT2 format applications, the second partition for storage, let the rest for cache memory.
- Choose Partition SD Card, then I fill the first 500MB partition, then select o.
- After partitioning is completed next install the downloaded ROM. Copy the ROM by going to mounts and storage. after the drive appear, copy the ROM file into the partition that you have made. then Unmount back.
- The last step select Install zip from SDCARD. Select the copied ROM file and wait.
- Once the process is complete, do the boot. Congratulations you have successfully installed a custom ROM.
Ok, that for tutorial today on How install Custom rom on HTC Wildfire s, which is this time use jikantaru ROM. i hope it helps you. please comment if you want to ask me.
Monday, August 26, 2013
How to Root Galaxy Tab 7 0 Plus P6200 on Android 4 1 2 XXMC3 Jelly Bean Firmware
Samsung Galaxy Tab 7.0 Plus P6200 users who have already updated their devices with Android 4.1.2 XXMC3 Jelly Bean firmware, may root their devices using the tutorial below.
This tutorial uses CF-Auto-Root file released by recognised XDA Developers, Chainfire. The CF-Auto-Root file allowing Galaxy Tab 7.0 Plus users to root their devices easily.
Disclaimer: Rooting voids the warranty of your device. We and the developer of this rooting procedures shall not be held responsible if any undesirable outcomes may happen to your device. use of this root guide is solely at your own risk!
Pre-Requisites
1) Install USB Driver for Samsung Galaxy Tab 7.0 Plus on your computer.
2) Enable USB Debugging Mode. [Press Menu >> Settings >> Applications. From there navigate and tap on Development option and ensure the USB Debugging is turned on.]
3) Make a backup of all your important data before following the guide.
4) Ensure the battery of the tablet is charged more than 80 per cent.
5) The Recovery file and the Superuser files used for rooting are compatible only with the Samsung Galaxy Tab 7.0 Plus P6200 running on Android 4.1.2 XXMC3 Jelly Bean.
Steps to Install CWM Recovery on Samsung Galaxy Tab 7.0 Plus P6200
Step 1: Download Recovery.tar.rar file for Galaxy Tab 7.0 Plus to the computer and extract using winrar/7zip/winzip or any other extracting tool
Step 2: Download Superuser-3.1.3-arm-signed.zip file and copy to SD card of tablet
Step 3: Download Odin 3.07 and extract the zip file
Step 4: Switch off the tablet and place it into Download Mode. To do so press and hold Volume Down and Power buttons together. A warning screen will arrive, then press Volume Up button to enter into Download Mode
Step 5: Run Odin on your computer
Step 6: Connect the tablet to the computer using the USB cable while the device is in the Download Mode. A message saying Added will arrive under Odins message box in the bottom left. You will also get to see COM port with a number in Yellow when the tablet is connected to the computer successfully
Step 7: In Odin, click the PDA and select the recovery.tar.md5 file
Step 8: Ensure the Re-Partition option in Odin is not selected
Step 9: Double-check and click Start in Odin. The installation process will now begin
Step 10: Once installation is completed, the tablet will reboot automatically. After the home screen appears, unplug USB cable from the tablet to disconnect it from the computer
Steps to root Galaxy Tab 7.0 Plus by Installing SuperSU via CWM Recovery
Step 11: Reboot tablet into Recovery mode by pressing and holding Volume Up and Power buttons together.
Step 12: Once device is in Recovery mode, use Volume to scroll to Apply Update Zip from internal storage
Step 13: Now select install zip from sdcard, select choose zip from sdcard and then navigate to the Superuser-3.1.3-arm-signed.zip. Select and confirm installation by selecting Yes
Step 14: Once installation process is completed, return to main recovery menu and select reboot system now to reboot tablet
The Samsung Galaxy Tab 7.0 Plus P6200, running official Android 4.1.2 XXMC3 Jelly Bean, is now rooted successfully. Open the app drawer of the Galaxy tablet and look for an app called superuser.
Thanks to all fellas at XDA who first tried out this rooting technique. This root method was originally posted via XDA-Developers original thread.
Sunday, August 25, 2013
How to Update Galaxy Note 8 0 Wi Fi N5110 with Android 4 1 2 UEEMF1 Jelly Bean Official Firmware

Firmware details
PDA: N5110UEEMF1
CSC: N5110XAREMF1
MODEM: N5110UEEMF1
Version: Android 4.1.2
Built date: Jun 04, 2013
Regions: United States
Samsung Galaxy Note 8.0 (Wi-Fi) N5110 users who missed the OTA update notification or unable to access the update over Samsung KIES, may follow our step-by-step guide to install the update manually.
Pre-requisites
1. Install USB Driver for Samsung Galaxy Note 8.0 (Wi-Fi) on the computer.
2. Enable USB Debugging Mode on the phone by navigating to Settings >> Developer Options.
3. Make a backup of all your important data before following the guide.
4. Ensure the battery of the phone is charged more than 80 per cent.
5. The Android 4.1.2 UEEMF1 Jelly Bean firmware is compatible only with Samsung Galaxy Note 8.0 (Wi-Fi) N5110. Applying this to any incorrect variant might brick the device. Verify the model number of the Galaxy Note 8.0 (Wi-Fi) by navigating to Settings >> About Phone.
File Required
1. Android 4.1.2 UEEMF1 Jelly Bean Firmware for Galaxy Note 8.0 (Wi-Fi) N5110
2. Odin 3.07
Steps to Update Galaxy Note 8.0 (Wi-Fi) N5110 with Android 4.1.2 UEEMF1 Jelly Bean Firmware
Step 1: Extract Firmware zip file that you downloaded already from above link using winrar/7zip/winzip or any other extracting tool, you will get a .tar.md5 file and some other files.
Step 2: Extract Odin zip file and you will get Odin3 v3.07.exe along with few other files.
Step 3: Power off your phone. Wait 5-6 seconds for vibration to confirm complete switch off.
Step 4: Boot the device into Download Mode by pressing and holding Volume Down + Home buttons together and then press the Power button until the device turns on. Now press the Volume Up button to enter Download Mode.
Step 5: Run Odin on the computer as an Administrator.
Step 6: Connect the Galaxy Note 8.0 (Wi-Fi) to the computer using USB cable while it is in the Download Mode. Wait until Odin detects the device. When the device is connected successfully, the ID: COM box will turn yellow with the COM port number. Additionally, the successful connected will be indicated by a message saying Added. If Odin fails to detect the device then re-install USB driver.
Step 7: Choose the following files in Odin from extracted N5110UEEMF1 firmware folder by using respective checkboxes:
- Select the PDA checkbox, and choose the file named .tar or .md5.
- Click the Phone checkbox, and choose the file with modem in its name (ignore if there is no such file)
- Click the CSC checkbox, and select the file with csc in its name (ignore if such file is missing)
- Choose the PIT checkbox, and choose the .pit file. Use only the file obtained during extracting in step 1 above, otherwise ignore it.
Step 8: In Odin, enable Auto Reboot and F. Reset Time checkboxes. Also, ensure the Re-Partition checkbox is chosen only if a .pit file was chosen in the previous step.
Step 9: Verify everything suggested in Step 7 and Step 8 is done correctly. Then hit the START button to begin the installation process.
Step 10: Once the installation process is completed, your phone will restart and soon you will see a PASS message with green background in the left-most box at the very top of the Odin. You can now unplug the USB cable to disconnect your device from computer.
Samsung Galaxy Note 8.0 (Wi-Fi) N5110 should be now updated with official Android 4.1.2 UEEMF1 Jelly Bean firmware. Head over to Settings >> About Phone to verify the software version running on the device.
Note: If Galaxy Note 8.0 (Wi-Fi) N5110 stuck at booting animation after Step 10 then go to recovery mode (press and hold the Volume Up, Home and Power buttons together) and perform Wipe data/Factory Reset and Wipe Cache Partition task before selecting reboot system now function. In recovery mode use Volume keys to navigate between options and Power key to select the option. Please note, performing wiping task will erase your device internal memory data and not external SD card data.
Click here to know How to Root Galaxy Note 8.0 (Wi-Fi) N5110 running on Android 4.1.2 UEEMF1 Jelly Bean firmware.
Saturday, August 24, 2013
How to be an Ironman
In the world there are a lot of different sports, some of them are more diffiult than others but, whats is the hardest sport?
Well, in my opinon this question has a possible answer: the Ironman.
When we talk about Ironman, we are not talking about the film, we refer to a type of triathlon but in an extreme way, this mixure of sports is formed by a race in which the athlete has to swim 4 km, to cycle 180 km and finally to run a marathon (42,2 km); but not during all your live, the athlete has to do it in less than 17 hours.
This “type of die” has their beginnings in Hawaii, where the most important Ironman race takes place. Its not very common to see an Ironman race, there only few cities that are able to organize it. Here in Spain, people who are interested in participate in one of this races, have the possibility of doing it in Lanzarote.
It is not necessary to say that to take part in an Ironman you have to spend several months with a hard level of training, in all the differents sports that the triathlon is composed by.
From my own point of view I think that its necessary to make a great physical effort to finish one of these races, but I like the sport and challenges so I wish that one day I will cross that finish line and became in an Ironman.
Heres a comedy video about a men who took part in an Iroman race and achieved his goal.
Edu Espinosa Celdrán
Monday, July 22, 2013
How To Deal With A Laptop Batteries run out quickly
How To Deal With A Laptop Batteries run out quickly - Electronic items such as cell phone, gadgets, laptops, netbooks, and others are very flexible and can be brought anywhere to suit our needs, such as electronic goods is using the battery. So it can be taken anywhere without having to plug in to the mains, the battery is fully record or previous charge.
Even so easily we follow the times are all-powerful, but there are some problems that arise due to the use of electronics. Especially for electronics that use batteries and one of them is a laptop. Very annoying when were using a laptop in an important job, but suddenly the laptop battery run out quickly, what more when we are again outside the home as in public places have Wi-Fi or Hot Spot areas such as malls, hospitals, homes eating, or the others. Indeed, in places like that there is no electricity, but if you are always ready to bring the charger.
The cause of laptop battery life.
One example is the use or while operating a laptop in a long time and also did charge laptop irregular. Batteries are used for many kinds laptop, durable or perishable matter dependent users in operating the laptop.

How To Overcome And Restore The Laptop Battery life :
- Refrigerator or freezer, If you do not have a refrigerator or freezer, you can use the refrigerator neighbors.
- Plastic wrapping, You can use plastic wrap ice thick enough plastic or other, as it does not leak.
- Strap, We will use this rope to tie up the plastic, use a rubber strap or plastic that is easy to tie. Do not use rope, itll actually too big and was not able to bind to the plastic.
- Batteries are experiencing Drop, Remove the battery from the laptop ngedrop, tips and tricks I recommend this only for the battery actually has experienced a drop or in a state of total disrepair.
How to restore laptop battery quickly drains:
- Insert the laptop battery into the plastic and wrap tightly with a rope tightly that you prepared earlier. With a record not to get plastic parts can later conceded that leaked water ice.
- If the laptop battery is wrapped tightly in plastic, and then enter into a freezer refrigerator or freezer.
- Allow the battery stored in the freezer or fridge for a full day or overnight. For other tips to make it more mantab be on leave for one to three days.
- After doing the three steps above, please remove the laptop battery is still tightly wrapped in plastic.
- Remove the laptop batteries from the plastic wrap, then let stand at normal temperature. For other tips on the internet there is an advocate for basking in the sun, but this suggestion I do not recommend it for you.
- If the condition of the laptop battery is back to normal temperature was not as cold or when you first remove it from the freezer on, please put it back in the laptop.
- Once the battery is properly installed on the laptop, the laptop please do not in turn. This is to avoid fatal damage to the laptop battery.
- Please pal charge the laptop is off until the full 100%. There are other tips suggested charge the battery the laptop is off to eight hours or as a new battery when the charge first.
- Then do step charge the laptop battery is 100% full flavor. Please turn it on or restart your laptop. Is the laptop battery is back to normal, if the laptop battery there are still problems, please repeat the above steps with a different way and volume to successfully implementing the right composition.
My advice if you are buying a laptop battery should be original and match the series, the original laptop battery definitely guaranteed quality.
Subscribe to:
Posts (Atom)