Showing posts with label update. Show all posts
Showing posts with label update. Show all posts
Tuesday, September 17, 2013
Samsung Galaxy Note launched 10 1 Android 4 1 update XXBLJ9
Finally Another Samsung device Receive Android Jelly Bean update. And at this time is the turn for Samsung Galaxy Note 10.1. So For You The Owner Of the one of the samsung flasgship device can update to the latest version of android operating System. Then you can feel the joy of the project butter. Android 4.1 official firmware for galaxy Note 10.1 At this moment only available for German via OTA. Or If you want you can also download the firmware from samfirmware.com then manually flash it. The size of firmware file is 300MB. Android is good
The OTA update is about 300 MB in size, has the version number XXBLJ9, brings with it some new features and especially the accelerated system. New features include pop-play, new gestures, cutting out the function of the Galaxy Note II and new pop-up apps.
New features On Galaxy Note Android 4.1
Following is the new features on Samsung Galaxt Note 10.1 with Android Jelly Bean:- The S-Pen functionality is now the equivalent of the Galaxy Note II
- Multitasking was improved, the size of the windows can be changed.
- The app is now on board Paper Artist (Also available at the grade II)
- New font selectable
- New apps pop (picture with Julian c)
- Create quick command window, new commands
- Faster system
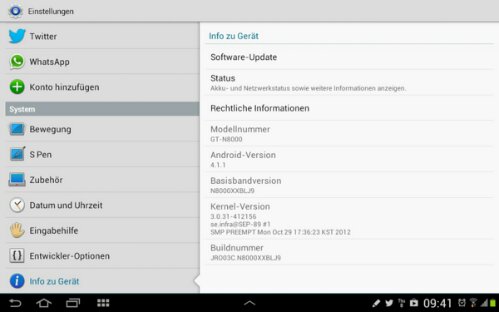
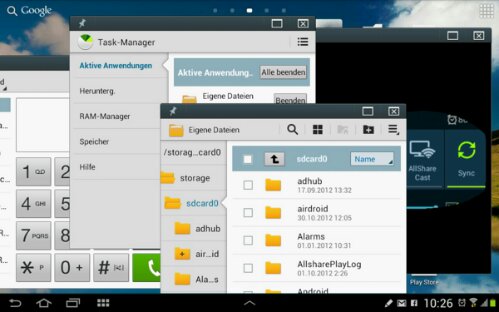
Now, after the Samsung GALAXY Note 10.1 receive Android 4.1 Update, in the coming days is likely the Samsung Galaxy S2 and the Samsung GALAXY Note finally be honored with Android 4.1. For these two models, the update was indeed also scheduled for November. When the time comes then, here you will find out!

Thursday, September 5, 2013
How to Update Galaxy Tab 7 0 Plus P6200 with Android 4 1 2 XXMD6 Jelly Bean Official Firmware

This update brings some new stuff on the Samsung Galaxy Tab Plus 7.0 such as Google Now, Smart Stay, Blocking Mode that let users block any unwanted calls, new Gallery, a redesigned Home Screen launcher, Text-to-speech capability and a new notifications settings.
Firmware details
PDA: P6200XXMD6
CSC: P6200OLBMD5
Version: Android 4.1.2
Built date: April, 2013
Regions: Indonesia, Malaysia, Philippines, Singapore, Vietnam, Thailand
The Galaxy Tab 7.0 Plus users who fail to upgrade their devices with Android 4.1.2 XXMD6 Jelly Bean via official method for being region specific, may follow our step-by-step guide to install the update manually.
Pre-requisites
1. Install USB Driver for Samsung Galaxy Tab 7.0 Plus on the computer.
2. Enable USB Debugging Mode on the phone by navigating to Settings >> Developer Options.
3. Make a backup of all your important data before following the guide.
4. The Galaxy Tab 7.0 Plus should be factory unlocked and not locked to any particular carrier.
5. Ensure the battery of the tablet is charged more than 80 per cent.
6. The Android 4.1.2 XXMD6 Jelly Bean firmware is compatible only with Samsung Galaxy Tab 7.0 Plus P6200. Applying this on any incorrect variant will brick the device. Verify the model number of the Galaxy Tab 7.0 Plus by navigating to Settings >> About Phone.
File Required
1. Android 4.1.2 XXMD6 Jelly Bean Firmware for Galaxy Tab 7.0 Plus P6200
2. Odin 3.07
Steps to Update Galaxy Tab 7.0 Plus P6200 with Android 4.1.2 XXMD6 Jelly Bean Firmware
Step 1: Extract Firmware zip file that you downloaded already from above link, you will get a .tar.md5 file and some other files.
Step 2: Extract Odin zip file and you will get Odin3 v3.07.exe along with few other files.
Step 3: Power off your tablet. Wait 5-6 seconds for vibration to confirm complete switch off.
Step 4: Boot the device into Download Mode by pressing and holding Volume Down and Power buttons together. A warning screen will arrive, then press Volume Up button to enter into Download Mode.
Step 5: Run Odin on the computer as an Administrator.
Step 6: Connect the Galaxy Tab 7.0 Plus to the computer using USB cable while it is in the Download Mode. Wait until Odin detects the device. When the device is connected successfully, the ID: COM box will turn yellow with the COM port number. Additionally, the successful connected will be indicated by a message saying Added. If Odin fails to detect the device then re-install USB deriver.
Step 7: Choose the following files in Odin from extracted P6200XXMD6 firmware folder by using respective checkboxes:
- Select the PDA checkbox, and choose the file named .tar or .md5.
- Click the Phone checkbox, and choose the file with modem in its name (ignore if there is no such file)
- Click the CSC checkbox, and select the file with csc in its name (ignore if such file is missing)
- Choose the PIT checkbox, and choose the .pit file. Use only the file obtained during extracting in step 1 above, otherwise ignore it.
Step 8: In Odin, enable Auto Reboot and F. Reset Time checkboxes. Also, ensure the Re-Partition checkbox is chosen only if a .pit file was chosen in the previous step.
Step 9: Verify everything suggested in Step 7 and Step 8 is done correctly. Then hit the START button to begin the flashing process.
Step 10: Once flashing completed, your tablet will restart and soon you will see a PASS message with green background in the left-most box at the very top of the Odin. You can now unplug the USB cable to disconnect your device from computer.
Samsung Galaxy Tab 7.0 Plus P6200 should be now updated with official Android 4.1.2 XXMD6 Jelly Bean. Head over to Settings>> About Phone to verify the software version running on the device.
Note: If Galaxy Tab 7.0 Plus P6200 stuck at booting animation after Step 10 then go to recovery mode (press and hold the Volume Up and Power buttons together) and perform Wipe data/Factory Reset and Wipe Cache Partition task before selecting reboot system now function. In recovery mode use Volume keys to navigate between options and Power key to select the option. Please note, performing wiping task will erase your device internal memory data and not external SD card data.
Click here to know How to Root Galaxy Tab 7.0 Plus P6200 running on Android 4.1.2 XXMD6 Jelly Bean firmware.
Step 9: Verify everything suggested in Step 7 and Step 8 is done correctly. Then hit the START button to begin the flashing process.
Step 10: Once flashing completed, your tablet will restart and soon you will see a PASS message with green background in the left-most box at the very top of the Odin. You can now unplug the USB cable to disconnect your device from computer.
Samsung Galaxy Tab 7.0 Plus P6200 should be now updated with official Android 4.1.2 XXMD6 Jelly Bean. Head over to Settings>> About Phone to verify the software version running on the device.
Note: If Galaxy Tab 7.0 Plus P6200 stuck at booting animation after Step 10 then go to recovery mode (press and hold the Volume Up and Power buttons together) and perform Wipe data/Factory Reset and Wipe Cache Partition task before selecting reboot system now function. In recovery mode use Volume keys to navigate between options and Power key to select the option. Please note, performing wiping task will erase your device internal memory data and not external SD card data.
Click here to know How to Root Galaxy Tab 7.0 Plus P6200 running on Android 4.1.2 XXMD6 Jelly Bean firmware.
Thursday, August 29, 2013
Android 4 1 Update For Samsung Galaxy Tab 2 7 0 Release
There is a new android update for another Samsung Device. Today samsung has started the release of android 4.1 update for samsung Galaxy tab 2 7.0 (GT-P3100) Model. So For you that maybe expected the android 4.1.2 update for galaxy s3 or 4.1 for galaxy s2 dont be disappointed because samsung will release those update soon. just be patient, and stay up to date with this blog to get the update news. Ok now lets back to the main topic, i will discuss more about galaxy tab 2 GT-P3100 update to android 4.1.1.Android is good
The Samsung Galaxy Tab 2 7.0 is an entry-level Android - Tablet. However, the tablet plays hardly in any role, and is also less and less attention from its manufacturer. The reason is quite simple, the overwhelming competition from the Nexus 7 and from their own home through the 10th Nexus And a different model from the South Koreans would make this difficult to create curiosity, the Samsung GALAXY Note 10.1.
Unfortunately The Samsung GALAXY Tab 2 7.0 Android 4.1.1 Update time is only for Vodafone branded model, this update starts today in Germany, Italy, Greece, Spain, Romania and Slovenia. Other countries will follow. However, we know from experience that the "free" Android tablets will also soon receive the update.

Whether this tablet will come but also receive the update to Android 4.2 or not, i still doubt for it. But with Samsung, you never know.
Sunday, August 25, 2013
How to Update Galaxy Note 8 0 Wi Fi N5110 with Android 4 1 2 UEEMF1 Jelly Bean Official Firmware

Firmware details
PDA: N5110UEEMF1
CSC: N5110XAREMF1
MODEM: N5110UEEMF1
Version: Android 4.1.2
Built date: Jun 04, 2013
Regions: United States
Samsung Galaxy Note 8.0 (Wi-Fi) N5110 users who missed the OTA update notification or unable to access the update over Samsung KIES, may follow our step-by-step guide to install the update manually.
Pre-requisites
1. Install USB Driver for Samsung Galaxy Note 8.0 (Wi-Fi) on the computer.
2. Enable USB Debugging Mode on the phone by navigating to Settings >> Developer Options.
3. Make a backup of all your important data before following the guide.
4. Ensure the battery of the phone is charged more than 80 per cent.
5. The Android 4.1.2 UEEMF1 Jelly Bean firmware is compatible only with Samsung Galaxy Note 8.0 (Wi-Fi) N5110. Applying this to any incorrect variant might brick the device. Verify the model number of the Galaxy Note 8.0 (Wi-Fi) by navigating to Settings >> About Phone.
File Required
1. Android 4.1.2 UEEMF1 Jelly Bean Firmware for Galaxy Note 8.0 (Wi-Fi) N5110
2. Odin 3.07
Steps to Update Galaxy Note 8.0 (Wi-Fi) N5110 with Android 4.1.2 UEEMF1 Jelly Bean Firmware
Step 1: Extract Firmware zip file that you downloaded already from above link using winrar/7zip/winzip or any other extracting tool, you will get a .tar.md5 file and some other files.
Step 2: Extract Odin zip file and you will get Odin3 v3.07.exe along with few other files.
Step 3: Power off your phone. Wait 5-6 seconds for vibration to confirm complete switch off.
Step 4: Boot the device into Download Mode by pressing and holding Volume Down + Home buttons together and then press the Power button until the device turns on. Now press the Volume Up button to enter Download Mode.
Step 5: Run Odin on the computer as an Administrator.
Step 6: Connect the Galaxy Note 8.0 (Wi-Fi) to the computer using USB cable while it is in the Download Mode. Wait until Odin detects the device. When the device is connected successfully, the ID: COM box will turn yellow with the COM port number. Additionally, the successful connected will be indicated by a message saying Added. If Odin fails to detect the device then re-install USB driver.
Step 7: Choose the following files in Odin from extracted N5110UEEMF1 firmware folder by using respective checkboxes:
- Select the PDA checkbox, and choose the file named .tar or .md5.
- Click the Phone checkbox, and choose the file with modem in its name (ignore if there is no such file)
- Click the CSC checkbox, and select the file with csc in its name (ignore if such file is missing)
- Choose the PIT checkbox, and choose the .pit file. Use only the file obtained during extracting in step 1 above, otherwise ignore it.
Step 8: In Odin, enable Auto Reboot and F. Reset Time checkboxes. Also, ensure the Re-Partition checkbox is chosen only if a .pit file was chosen in the previous step.
Step 9: Verify everything suggested in Step 7 and Step 8 is done correctly. Then hit the START button to begin the installation process.
Step 10: Once the installation process is completed, your phone will restart and soon you will see a PASS message with green background in the left-most box at the very top of the Odin. You can now unplug the USB cable to disconnect your device from computer.
Samsung Galaxy Note 8.0 (Wi-Fi) N5110 should be now updated with official Android 4.1.2 UEEMF1 Jelly Bean firmware. Head over to Settings >> About Phone to verify the software version running on the device.
Note: If Galaxy Note 8.0 (Wi-Fi) N5110 stuck at booting animation after Step 10 then go to recovery mode (press and hold the Volume Up, Home and Power buttons together) and perform Wipe data/Factory Reset and Wipe Cache Partition task before selecting reboot system now function. In recovery mode use Volume keys to navigate between options and Power key to select the option. Please note, performing wiping task will erase your device internal memory data and not external SD card data.
Click here to know How to Root Galaxy Note 8.0 (Wi-Fi) N5110 running on Android 4.1.2 UEEMF1 Jelly Bean firmware.
Step 9: Verify everything suggested in Step 7 and Step 8 is done correctly. Then hit the START button to begin the installation process.
Step 10: Once the installation process is completed, your phone will restart and soon you will see a PASS message with green background in the left-most box at the very top of the Odin. You can now unplug the USB cable to disconnect your device from computer.
Samsung Galaxy Note 8.0 (Wi-Fi) N5110 should be now updated with official Android 4.1.2 UEEMF1 Jelly Bean firmware. Head over to Settings >> About Phone to verify the software version running on the device.
Note: If Galaxy Note 8.0 (Wi-Fi) N5110 stuck at booting animation after Step 10 then go to recovery mode (press and hold the Volume Up, Home and Power buttons together) and perform Wipe data/Factory Reset and Wipe Cache Partition task before selecting reboot system now function. In recovery mode use Volume keys to navigate between options and Power key to select the option. Please note, performing wiping task will erase your device internal memory data and not external SD card data.
Click here to know How to Root Galaxy Note 8.0 (Wi-Fi) N5110 running on Android 4.1.2 UEEMF1 Jelly Bean firmware.
Sunday, July 28, 2013
Jelly Bean Update for Sony Xperia TX Will Attend March

Sony Mobile rumored to have confirmed that the Sony Xperia TX will soon get operating system updates Jelly Bean.
But unfortunately TX Xperia users will have to wait another month to be able to enjoy the pleasure of Jelly Bean because this new update will be available next March. This update brings the latest version of the application itself WALKMAN, Albums and Movies; new launcher with 7 home screen, and a variety of other new features.
As a reminder, other phones like the Sony Xperia P, Xperia and Xperia J will go get the update at the end of March. As for the Xperia S, SL Xperia, Xperia ion and Xperia acro S will get the update in April.
Subscribe to:
Posts (Atom)